Tuesday, April 27, 2010

Averted Fiasco à la Poule au pot

Laura Calder is fallible! I made her Poule au pot, and part of the recipe calls for 12 onions... TWELVE! I almost blindly followed my Hestia's directions and halted before it was too late, researched Poule au pot on other sites and saw that it must have been an error (although Martha Stewart does list 8 leeks in her recipe). I also put in 11 whole pepper corns instead of ground pepper. I'm not sure if that made a difference or not, but it turned out really yummy. Ben said it was 'scrummy'; he's cute when he's enthusiastic about my food so I let that one slide...
NOTE - this is also a good way of making some lightweight chicken stock; just save the cooking liquid you don't use when serving.

1 3-pound/1.5 kg chicken
Enough chicken stock to cover (about 8 cups)
1 bay leaf
1 sprig thyme
1 sprig tarragon
Salt (lots)
11 peppercorns
6 cloves garlic peeled
2 large leeks or 4 small, cleaned, trimmed and thickly sliced (18oz/510gr)
2 onions, peeled
4 carrots, scraped and cut into chunks
3 celery stalks, cut into finger lengths
1 small turnip, sliced
3 parsnips, scraped and sliced
  1. Lay a large piece of cheesecloth onto a work surface and put the chicken breast-side down onto it. Gather up the edges and tie them with the kitchen string. Put the chicken into the pot, breast-side up and pour over chicken stock. Bring to a boil. Skim off the foam that rises until no more forms, about half an hour.
  2. While chicken boils, assemble 1 bay leaf, large sprig thyme, sprig tarragon, lots of salt, 11 peppercorns, prepare garlic and leeks, and set aside. Prepare rest of vegetables and keep aside until next step. NOTE, don't cut the veg too big - they won't cook quickly enough.
  3. When chicken has boiled for 30 mins, add the bay leaf, thyme, tarragon, salt, peppercorns, along with the garlic and leeks. Turn the chicken, breast side down. Cover, and simmer very gently about 20 minutes more. Add the remaining vegetables, turn the chicken breast side up, and continue cooking until the juices in the chicken run clear and the vegetables are tender, about 20 minutes longer. When removing from cheese cloth, be careful; the chicken will be so tender it pulls apart easily. Serve pieces of chicken and vegetables with some broth pooled around.

Saturday, April 24, 2010

Easy, Elegant Broiled Salmon - Broiled Salmon with Mustard and Crisp Dilled Crust

I am still amazed at how easy cooking is, if you have the right recipe. This is such a tasty recipe and it is quick and simple to make. The first time I made it was for dinner on Christmas Eve at my parent's this past Christmas, when it was just my parents, Ben and Myself for dinner. The salmon was scrumptious, although I did have to make some changes to the recipe.
Generally speaking it is best to have salmon with the skin on - it seems to be more moist - but I've also prepared it with skinned salmon cut into individual portions with equal success. Use the foil as suggested in the recipe - the salmon, with or without skin, will stick to the pan and dry out faster.
This is from Cook's Illustrated with, as usual, some refinements on my part.
NOTE - if you're cooking individual portions of fish, reduce the cooking time. Last time I made it this way the fish was a bit dry.

1 cup Panko
4 oz plain high-quality potato chips, crushed into rough 1/8-inch pieces, about 1 cup
6 Tbsps. chopped fresh dill leaves
1 whole side of salmon fillet , about 3 1/2 lbs., pinbones removed and belly fat trimmed
1 tsp. mild vegetable oil
3/4 tsp. salt
Ground black pepper
3 Tbsps. Dijon mustard

  1. Adjust the first oven rack to an upper position, about 8 inches from the upper element, and then the second rack to one position lower; heat the oven to 400 degrees.
  2. Toast the bread crumbs evenly on a rimmed baking sheet and toast it on the lower rack to freshen it up, briefly, until light brown, shaking the pan once or twice. Toss together the bread crumbs, the crushed potato chips, and the dill in small bowl; set aside.
  3. Increase the oven setting to broil. Cut piece of heavy-duty foil 6 inches longer than the fillet. Fold the foil lengthwise in thirds and place it lengthwise on a rimmed baking sheet; position the salmon lengthwise on the foil, allowing for the excess foil to overhang the baking sheet. Rub the fillet evenly with oil and sprinkle with salt and pepper.
  4. Broil the salmon on the upper rack until the surface is spotty brown and the outer 1/2-inch of the thick end is opaque when gently flaked with a paring knife, 9 to 11 minutes.
  5. Remove it from the oven and spread evenly with the mustard; press the bread crumb mixture onto the fish, using the mustard as the glue. Return the fish to the lower rack and continue broiling until the crust is deep golden brown, about 1 minute longer.

Tuesday, April 20, 2010

Chocolate-Stuffed Figs

These are surprising and delicious. I like to use bittersweet chocolate; when you bite into one there is the rich, bitter flavor of the chocolate that is transformed by the intense sweetness of the fruit. Apparently the best dried figs are obtained from October to March, the leather of the dried fruit should be moist and supple, which also means easier filling with chocolate. As a dessert, it entertains with the novelty, and it seduces with its flavour. When I say this, I'm not being metaphorical - whenever I have made these the reaction is always dramatic and positive.
To serve you can leave the fruit unadorned, or you can dip half of it in couverture chocolate, or you can cut into quarters for more dainty bites. I got this from the book Pure Chocolate by Fran Bigelow and Helen Siegel.
1 cup heavy cream
8 ounces chocolate, finely chopped (70%)
24 to 36 dried Calimyrna figs, depending on size
1 1/2 pounds chocolate (70%), tempered (optional)

NOTE: Have ready a 9-by-13-inch or quarter sheet pan lined with parchment.
  1. In a saucepan, heat the cream over medium-high heat just until it begins to boil. Remove from the heat. Add the finely chopped chocolate. Stir with a rubber spatula until smooth. Pour the mixture into a bowl, cover with plastic wrap touching the top to exclude all air, and let set for 6 to 8 hours at room temperature.
  2. Prepare the figs for stuffing by gently rolling them between your thumb and fingers to loosen the seeds and soften the flesh. Insert a wooden or metal skewer in the hole in the bottom of the fig and wiggle it to enlarge the hole slightly for stuffing.
  3. When the ganache is set, gently stir it with a rubber spatula a few times. Spoon some into a pastry bag fitted with a small round 1/4-inch tip.
  4. Hold each fig's stem gently between your index and middle fingers, using your thumb to support the plump fruit. Insert the tip of the pastry bag into the fig's bottom and gently squeeze, stuffing until the fig is plump and full of ganache. Do not worry about leaks in the fig's skin. They can be fixed later.
  5. Place the filled figs on a parchment-lined pan and allow them to set at room temperature for at least 2 hours. Using a sharp knife, scrape the excess filling from each fig's exterior. With a pair of sharp scissors, snip off the very tip of each stem, which is too tough to be eaten, before serving (if not dipping).
  6. The stuffed figs can be stored in a sealed container in the refrigerator. Remove and return to room temperature for eating -- or dipping, if desired.
  7. To dip, follow tempering and dipping instructions to get the chocolate at the correct crystalizing temperature (coming, at some point!). Holding the stuffed fig by the stem, dip the bottom half of each fig into the tempered chocolate. Place the dipped fruit on a parchment-lined pan and let the chocolate set. If you haven't already, with a pair of sharp scissors, snip off the very tip of each stem, which is too tough to be eaten, before serving.

Le Bistro Paul Bert

I've never been to Paris and yet everything I hear about French bistros appeal to me. In Québec, restaurants often have a Table d'hôte, a meal deal of two or more dishes for a set price. I really like this idea for reasons of pleasure and economy (I think). For an affordable price you can get an appetizer, a main dish, and a dessert (or any permutation of the above). As the restauranteur, you can serve smaller portions of each dish, offer something different (in Vancouver, I think) and have fun pairing and making food to feed people. And, in terms of building a whole sensual experience, which, according to some theories, helps one feel satisfied with less food and therefore lose weight, well, it seems like a perfect plan.
I've started searching for examples of authentic Parisian bistro menus. My first hit proved very positive with the idea of the Table d'hôte, or, as they seemingly call it in Paris, a formule menu. It is a foodie blog which describes a meal at Le Bistro Paul Bert with foods I would not necessarily consider for La Mouffette Gourmande, but is interesting and gives ideas, like terrines as a side or as an appetizer, and fresh bread, which I'd like to be Miracle Boule.

EXPERIMENTATION: I wonder if the flour of a Miracle Boule could be washed off for a less messy bread to serve? Perhaps a quick wash right out of the oven so that the heat from the bread helps to evaporate the water, and then throw it back in the oven to crisp things up a bit?

Crème Fraîche


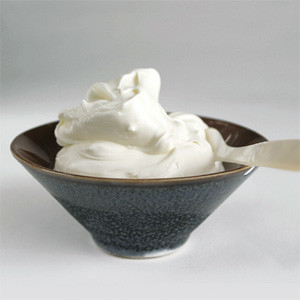
Several French recipes ask for crème fraîche, but it is difficult to find, expensive, and (apparently) not as good as what is available in Europe. So I've learned how to make it. Essentially it is a culture. I suspect it is mimicking the fresh cream we would get from Jean-Paul and Georgette when I was a boy - we'd laugh at my dad and be disgusted that he'd eat what we called 'crème sûre', or soured cream, i.e.: cream that had gone off. Now I realize my father has gourmet appetites, as he was eating crème fraîche, while I denied myself the pleasures of this mild, rich food for the sake of what I thought was 'gross'. So now I'm making up for lost time. Since unpasteurized cream is no longer legally available in Canada, it's possible to mimick the natural process by adding culture from butter milk.

 
1 cup heavy cream
2 Tbsp. (or more) buttermilk
  1. Pour the cream and buttermilk in a glass jar with the lid just resting on top and not screwed down.
  2. Leave it on the counter for 24-48 hours, shaking the jar whenever you think of it. Do not refrigerate it at this point! Refrigeration dramatically decreases the bacterial activity of the cultures that transform the cream into crème fraîche.
  3. The cream will become very thick, and you will have to shake it more and more vigorously as it thickens. If you don't shake the jar, the cultured part on top will seal off the liquid cream at the bottom and you'll have an uneven culturing, the top super thick and the bottom just plain liquid cream.
  4. Once it's reached the thickness you like (from stirred yogurt to thick mascarpone in texture) put it in the refrigerator and it will keep for about two weeks. Just keep in mind that, even in the refrigerator, the culture, as a living organism, will continue to thicken the cream.
  5. I've taken to simply adding more cream when the crème fraîche starts to run down instead of using more buttermilk. If the crème fraîche has been unused in the refrigerator for a long time, I give it a sniff test and if it smells bad, I dispose of it and start fresh again.

Monday, April 19, 2010

Tarragon Chicken

Ok, so I've made another Laura Calder recipe. So what? And no, I'm not defensive about it... much. I might as well admit it, I think she's great and I will likely be making a lot of her recipes. It's actually really unusual for me to glom onto one food writer, but, well, there you go! I have!
I tried, for the first time, her Tarragon Chicken recipe, but I altered it without considering the alterations. I used skinned and boned chicken breasts I'd cut into chunks because I wanted more of a stir-fry kind of dish. Well, I overcooked the chicken, although the sauce turned out very nicely. I can still use skinless and boneless chicken breasts, I just have to make sure I use the right cooking techniques for it before applying the sauce.
NOTE: If using CHICKEN BREASTS, follow the instructions for sautéeing chicken breasts and make the sauce as directed. Do not cook in the liquid for 30 minutes - cook breasts using the sauté method and make the sauce to pour on top.

1 Tbsp (1⁄2 oz/14gr) butter
1 Tbsp vegetable oil
1 chicken (about 3 pounds/1.4 kg), cut into 8 pieces
Salt and pepper
1⁄2 cup chicken stock
3⁄4 cup dry white wine
1 shallot, minced
1 cup crème fraîche
1⁄2 cup chopped fresh tarragon
Lemon juice to taste
  1. Melt the butter with the oil in a large skillet over quite high heat. Season the chicken pieces and fry in batches until well browned, about 5 minutes per side.
  2. Put all the chicken back in the pan, add the chicken stock and reduce the heat to medium. Cover and cook until tender, about 30 minutes - the internal temperature of the breast should read 165F. Remove the chicken to a plate and keep warm.
  3. Keep cooking the leftover juices and reduce until sticky - the correct moment of reduction can be heard, it's like making ghee, just listen to the sauce and when the sound changes, wait a few seconds longer and it's ready.
  4. Add the shallot and wine and reduce to a thickish sauce, about 5 minutes. Add the cream and half the tarragon. Boil down again until it thickens into a sauce, about 3 to 5 minutes.
  5. Season the sauce with salt, pepper, and lemon juice. Put the chicken pieces back in, turning to coat, then transfer to a platter. Pour the sauce over the chicken, joyfully scatter over the remaining tarragon, and serve.

Sunday, April 18, 2010

Carbonnade à la Flammande - Beef and Beer Stew

Last weekend someone broke into our apartment and stole my laptop - the one with all my recipes on it... So now I'm starting from scratch and saving the ones I like to this blog. One such recipe is Carbonnade à la Flammande. I'd found a version of it on a few different sites and tried them all. They were all good, but then I tried Laura Calder's version (I'm afraid that my blog will become a fan site for Laura!) and it was great. I made it again last night for Keven, my brother-in-law visiting from North Hollywood, and it was ok, but didn't compare to the first one I'd made; instead of caramelizing the onions, I cooked them until soft and brown from the beef residue, making them sweeter. Here is Carbonnade à la Flammande or, as Laura has called it, Beef in Beer.


2 Tbsps (1oz/28gr) butter, more as needed
1 Tbsp. vegetable oil
3 lbs sirloin tip, cut into cubes
3 onions, sliced
4 cloves garlic, chopped
2 Tbsps. flour
1 Tbsp. brown sugar
1 and 1/2 cup beef stock
2 cups beer
1 Tbsp. red wine vinegar
Salt and pepper
Bouquet Garni (I usually use parsley, thyme and a couple of bay leaves)
  1. Pre-heat the oven to 325F.
  2. Melt the butter and oil together in a sauté pan and, working in batches, brown the beef strips on all sides. Remove. In the same pan, fry the onions until soft and brown, about 10-15 minutes, then add the garlic one minute. Set aside. (Check if there is fat in the pan. If not, add a good tablespoon of butter and let it melt.)
  3. Add the flour and sugar to the pan and cook 1 minute to make a roux. Gradually whisk in the stock and bring to a boil. Add the beer and the vinegar to the boiling stock, and bring back to the boil, cooking until thickened, about 10 minutes. Turn off the heat and set aside.
  4. In a large casserole, layer the onion mixture alternately with the beef, seasoning each layer as you go with salt and pepper (don't skimp on the salt as the beer is quite sweet). Tuck in the bouquet garni and pour the liquid over. Cover and bake for 2-1/2 hours. If you can wait a day before eating; cool the dish completely when it’s out of the oven, and refrigerate overnight. The flavour will be even better when you reheat it.
EXPERIMENTATION: I haven't really paid attention to the kind of beer used, and would like to pin down if an ale is better than a stout or vice-versa.